Blog

  • How to iron polyester

    How to iron polyester

    If you’re dealing with wrinkles in your polyester garments, worry not! Learning how to iron polyester is easier than you might think. Polyester is a versatile fabric known for its durability and wrinkle resistance, but occasional creases can still happen. In this guide, we’ll walk you through the steps to achieve wrinkle-free perfection when ironing polyester.

    Polyester is a synthetic fabric commonly used in clothing, linens, and various household items. Its wrinkle-resistant properties make it a popular choice for travelers and busy individuals who don’t have the time to fuss with high-maintenance fabrics.

    Preparing Your Iron and Polyester Garment

    Before you start ironing, gather the following items:

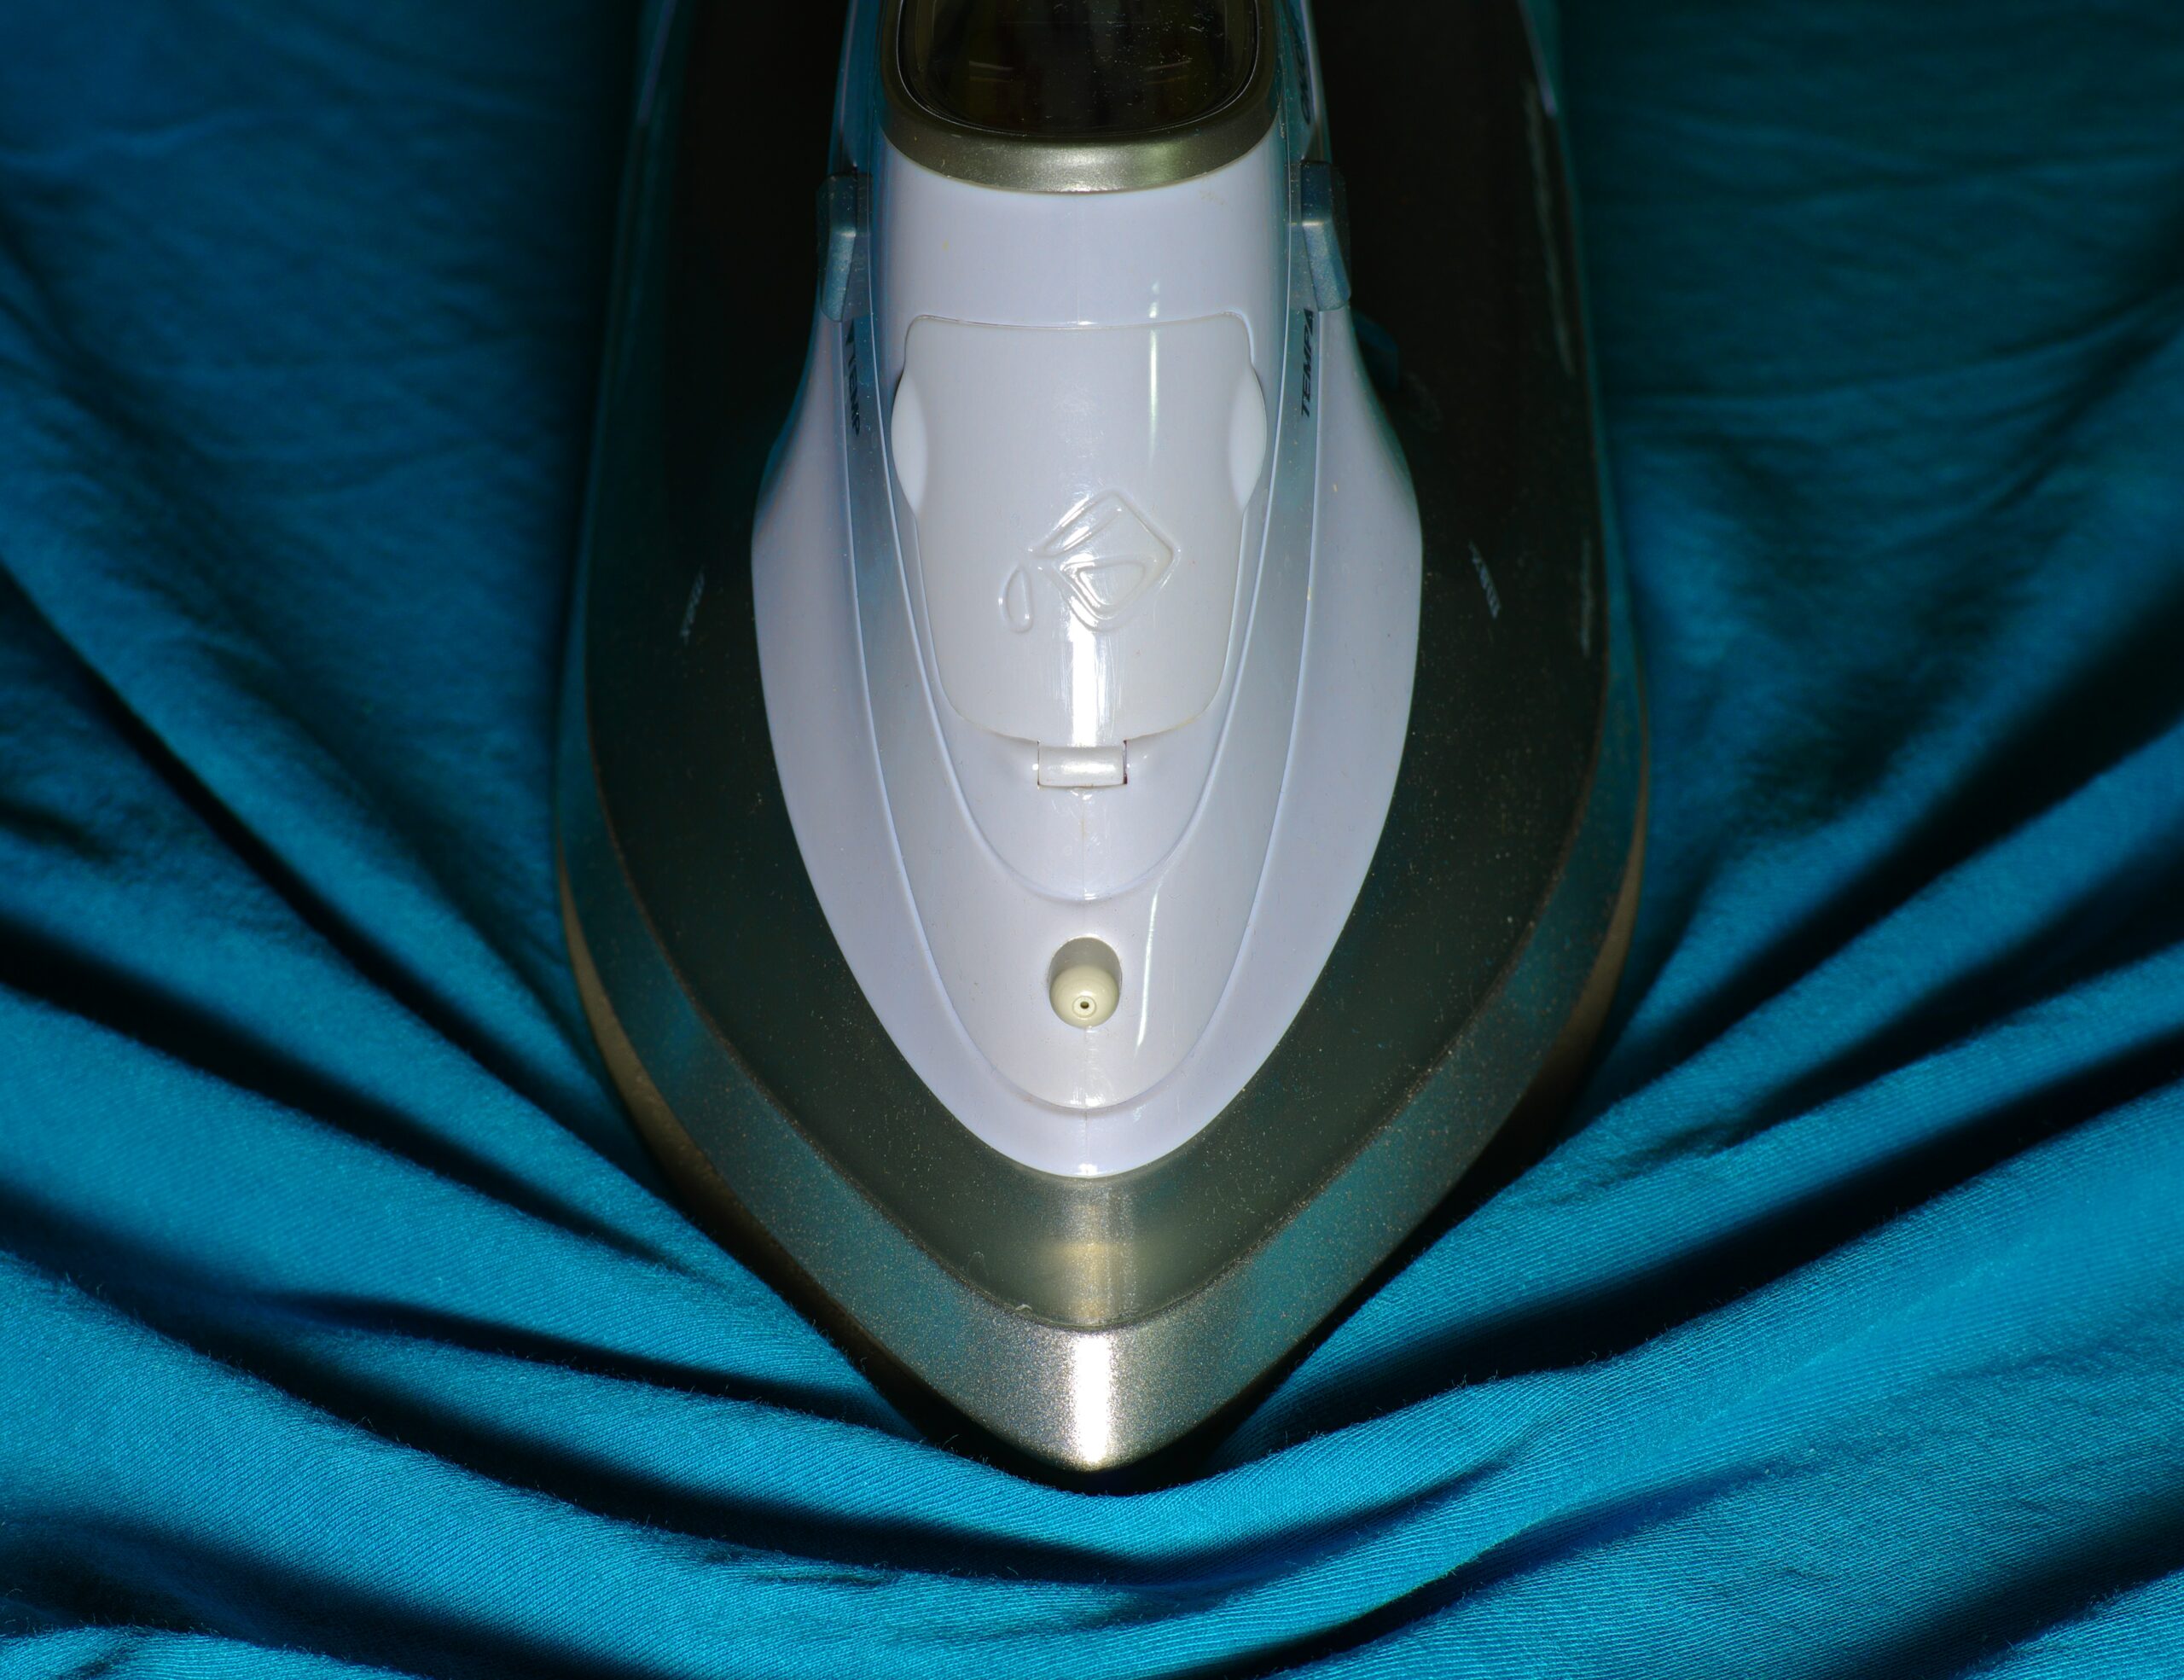
    1. An Iron: Ensure your iron is clean and set to a low to medium heat setting. Polyester is sensitive to high temperatures and can melt or scorch if the iron is too hot.
    2. Ironing Board: Set up a sturdy ironing board in a well-ventilated area.
    3. Clean Cloth: Have a clean, damp cloth on hand. You’ll use this as a protective barrier between the iron and your polyester garment.
    4. Hanger: Prepare a hanger nearby to hang your garment after ironing.

    Step-by-Step Guide: How to Iron Polyester

    1. Check the Label: Always check the care label on your polyester garment. It will provide specific instructions regarding heat settings and any special considerations.
    2. Heat the Iron: Turn on the iron and select the appropriate heat setting. In most cases, a low to medium setting is suitable for polyester. Avoid using the “cotton” or “linen” setting, as these are too hot for polyester.
    3. Prepare the Garment: Ensure the garment is clean and free of any stains. If there are stains, address them before ironing.
    4. Use the Damp Cloth: Place the clean, damp cloth over the wrinkled area of the garment. This cloth acts as a barrier, preventing direct contact between the hot iron and the fabric. It also adds a touch of steam, which can help release wrinkles.
    5. Iron in Sections: Gently press the iron onto the damp cloth-covered area. Move the iron in slow, straight motions, following the grain of the fabric. Avoid pressing too hard, as this can cause the polyester to stretch or become shiny.
    6. Repeat as Needed: Continue ironing small sections at a time until the wrinkles are gone. Be patient and take your time.
    7. Hang the Garment: Once you’ve finished ironing, hang the garment immediately to prevent new wrinkles from forming.

    Additional Tips for Ironing Polyester:

    • If your polyester garment has stubborn wrinkles, consider using a garment steamer. Steamers are gentle on fabrics and can effectively remove wrinkles without direct contact.
    • Always store your polyester clothing on hangers to prevent wrinkles from developing in the first place.
    • If you’re uncertain about the fabric’s reaction to heat, do a spot test on an inconspicuous area before ironing the entire garment.
    • Polyester blends may require lower heat settings than 100% polyester garments. Always check the care label for guidance.

    Conclusion

    Learning how to iron polyester is a valuable skill that can keep your clothing and linens looking crisp and fresh. By following these simple steps and using the right heat settings, you can maintain the wrinkle-free appearance of your polyester items. Remember to handle your garments with care, and they’ll continue to serve you well for years to come.

    Keywords: ironing polyester, polyester fabric, wrinkle-free, heat settings, garment care, clothing maintenance, polyester blends, ironing tips, garment steamer, care label

    Photo by Immo Wegmann on Unsplash

  • How to meditate with music

    How to meditate with music

    In the fast-paced world we live in, finding moments of tranquility and inner peace is essential for our mental and emotional well-being. Meditation, a practice that has been embraced for centuries, offers a path to a calm mind, reduced stress, and heightened self-awareness. One way to enhance your meditation experience is by incorporating music. In this guide, we’ll explore the art of meditating with music, helping you unlock a deeper level of mindfulness and relaxation.

    Why Meditate with Music?

    Meditation, in its essence, is about turning inward, focusing on your breath, and quieting the mind. Music, with its unique ability to evoke emotions and create atmosphere, can complement this practice beautifully. Here’s why you should consider meditating with music:

    • Enhanced Focus: Music can serve as an anchor, helping you stay present during meditation and prevent your mind from wandering.
    • Emotional Release: Certain melodies can help release pent-up emotions, allowing for a deeper emotional cleanse during your meditation sessions.
    • Stress Reduction: Music has the power to reduce cortisol levels, the hormone associated with stress, promoting relaxation.

    How to Meditate with Music:

    1. Select the Right Music:
      • Choose instrumental music or tracks with minimal lyrics to avoid distraction.
      • Experiment with different genres, such as classical, ambient, or nature sounds, to find what resonates with you.
    2. Create a Comfortable Space:
      • Find a quiet, comfortable place for your meditation practice.
      • Ensure you won’t be interrupted during your session.
    3. Set the Mood:
      • Dim the lights or use candles to create a serene ambiance.
      • Adjust the volume to a level that is soothing but not overpowering.
    4. Choose Your Meditation Technique:
      • Whether it’s mindfulness meditation, loving-kindness meditation, or any other technique, music can enhance your chosen practice.
    5. Start Slowly:
      • Begin your meditation session with a few deep breaths to center yourself.
      • Let the music guide your breath and thoughts.
    6. Stay Present:
      • Focus on the music as it unfolds, letting it wash over you.
      • If your mind starts to wander, gently bring your attention back to the music.
    7. Enjoy the Journey:
      • Allow the music to take you on a journey within, exploring your thoughts, feelings, and sensations.
    8. End Gracefully:
      • When your meditation time is up, gradually bring your awareness back to the room.
      • Take a moment to reflect on your experience.

    Keywords: Meditation, music, mindfulness, inner peace, relaxation, stress reduction, emotional release, meditation techniques, meditation practice.

    Incorporating music into your meditation practice can elevate your sessions, making them more enjoyable and effective. As you embark on this journey, remember that there’s no one-size-fits-all approach, so feel free to experiment and find the melodies that resonate most deeply with your soul.

    Photo by Jared Rice on Unsplash

  • How not to lose AirPods

    How not to lose AirPods

    In the age of wireless technology, AirPods have become a ubiquitous companion for many, offering convenience and quality sound. However, the small and lightweight design of these earbuds can make them prone to getting lost. The frustration of misplacing or losing your AirPods is something many can relate to. But fear not, as we’ll share invaluable tips and tricks on how not to lose AirPods and ensure they remain securely in your possession.

    1. Invest in a Protective Case

    One of the simplest yet most effective ways to prevent AirPods from getting lost is to use a protective case. Numerous options are available, from colorful silicone cases to sleek leather ones. These cases not only add a layer of protection but also make your AirPods more noticeable, reducing the chances of overlooking them.

    2. Enable “Find My” App

    If you own AirPods Pro or AirPods Max, you can take advantage of Apple’s “Find My” app. It allows you to locate your AirPods on a map, play a sound to help you find them, or mark them as lost to receive notifications when they are found. This feature can be a lifesaver when you’re unable to remember where you last had your AirPods.

    3. Use AirPods Straps or Clips

    If you’re concerned about your AirPods slipping out of your ears during workouts or outdoor activities, consider using AirPods straps or clips. These accessories secure your AirPods around your neck, reducing the risk of misplacement.

    4. Establish a Routine

    Make it a habit to always place your AirPods in their charging case when not in use. This routine can help you develop muscle memory and significantly reduce the likelihood of losing them.

    5. Be Mindful of Your Surroundings

    Pay attention to your surroundings, especially when you’re on the move. AirPods are more likely to fall out or get left behind when you’re in a rush or not paying full attention.

    6. Keep Your Case Charged

    The charging case for your AirPods is an essential accessory. Make sure it’s always charged and ready to go. This way, if you misplace your AirPods, you can use the “Find My” app to locate the case, which will lead you to the missing earbuds.

    7. Consider AirPods Insurance

    If you tend to lose things frequently, it might be worth considering insurance or protection plans that cover lost or stolen AirPods. While this won’t prevent loss, it can offer peace of mind knowing you can get replacements if they go missing.

    By following these tips on how not to lose AirPods, you can enjoy your wireless earbuds without the constant worry of misplacement. Keep them safe, secure, and always within your reach.

    Keywords: AirPods, wireless earbuds, prevent loss, protective case, Find My app, AirPods accessories, routine, surroundings, charging case, insurance.

    Remember, a little mindfulness and some practical precautions can go a long way in keeping your AirPods safe and sound.
    Photo by Hostaphoto on Unsplash

  • How to search in Google Sheets

    How to search in Google Sheets

    Are you tired of scrolling through endless rows and columns in your Google Sheets document, desperately trying to locate specific information? Fear not! In this guide, we’ll show you how to search in Google Sheets like a pro. Whether you’re managing data for work, school, or personal projects, these tips will save you time and frustration.

    Why Searching in Google Sheets Matters:

    Google Sheets is a powerful tool for organizing and analyzing data, but as your spreadsheet grows, finding specific information becomes challenging. Learning how to search effectively can make your work more efficient and accurate.

    How to Search in Google Sheets:

    1. Use Ctrl + F (or Command + F on Mac): This keyboard shortcut opens the “Find” function, allowing you to search for specific text within your spreadsheet.

    2. Enter Your Search Query: Type the word or phrase you want to find. Google Sheets will instantly highlight all matching instances.

    3. Navigate Through Results: Use the “Next” and “Previous” buttons in the search box to jump between different occurrences of your search term.

    4. Close the Search Box: When you’re done, simply click “Done” in the search box to exit the search mode.

    Tips for Efficient Searching:

    – Be specific with your search terms to narrow down results.
    – Use quotation marks to search for an exact phrase.
    – Take advantage of the “Replace” feature if you need to make changes to the found text.

    By mastering these search techniques, you’ll have the skills to quickly locate and manage data in your Google Sheets, making your work more productive and enjoyable.
    Now you have the tools to become a Google Sheets data-searching pro!

    Keywords Google Sheets, search, data, spreadsheet, find, Ctrl + F, efficiency, data management.
    Photo by Team Nocoloco on Unsplash

  • How to tie a bow

    How to tie a bow

    Tying a beautiful bow is a skill that comes in handy for various occasions, from gift wrapping to adding that perfect finishing touch to your outfits. Whether you’re crafting a gift or enhancing your style, knowing how to tie a bow is essential. In this step-by-step guide, we’ll walk you through the process, ensuring your bows always look picture-perfect.

    Materials You’ll Need:

    Before we dive into the steps, gather these materials:

    Ribbon or fabric: Choose a ribbon or fabric strip of your desired width and length. The color and texture depend on your project.
    Scissors: A sharp pair of scissors to cut the ribbon cleanly.
    Now, let’s get started on tying the perfect bow:

    Step 1: Make Two Loops

    Hold the ribbon in your hand, leaving a tail hanging down. Create a loop by folding the ribbon over itself, making a simple knot. This forms the first loop. Ensure that the loose end is behind the loop.

    Step 2: Cross the Loops

    Take the longer end of the ribbon and create another loop, similar in size to the first one. Cross this loop over the first one, forming an “X” shape.

    Step 3: Tuck and Pull

    Pass the top loop (the one you just created) behind the bottom loop, tucking it underneath. Pull the ends of both loops to tighten the bow.

    Step 4: Adjust and Fluff

    Hold onto the loops and tails, adjusting the size of the bow by pulling gently. To create a full and elegant bow, fluff out the loops and tails until you’re satisfied with the appearance.

    Step 5: Trim the Tails

    Using your scissors, trim the ends of the ribbon tails at an angle or in a V-shape to add a polished finish to your bow.

    And there you have it—the perfect bow! Practice makes perfect, so don’t be discouraged if your first attempt isn’t flawless. With time, you’ll become a bow-tying pro, impressing everyone with your beautifully wrapped gifts and stylish accessories. #everydaylife

    Photo by micheile henderson on Unsplash

  • How to dry your hair without a blow dryer

    How to dry your hair without a blow dryer

    Are you tired of the constant heat and noise of blow dryers wreaking havoc on your locks? Whether you’re looking to reduce damage, save energy, or simply embrace your hair’s natural texture, there are plenty of ways to dry your hair without a blow dryer. In this article, we’ll explore some gentle and effective methods that will leave your hair looking fabulous without the need for heat styling. Let’s dive in!

    1. Air Drying: The Simplest Method

    The easiest way to dry your hair without heat is to let it air dry naturally. After washing, gently squeeze excess water out with a soft towel, avoiding any vigorous rubbing that can cause frizz. Then, just let your hair hang loose or wrap it up in a clean, dry towel or a microfiber hair turban for a while. This method allows your hair to dry gradually and maintain its natural texture.

    2. Towel Turban Quick and Efficient

    A towel turban is a fantastic tool for drying your hair without heat. After your shower, flip your head forward, place your hair in the center of a large microfiber towel, twist the towel, and secure it at the nape of your neck. This method absorbs excess moisture quickly, leaving your hair damp but not dripping wet. It’s especially useful if you’re in a hurry.

    3. Plopping Enhancing Natural Curls

    For those with curly or wavy hair, “plopping” is a great technique to enhance your natural texture while drying. After applying your preferred hair products, lay a T-shirt flat, place your hair in the center, and wrap the sides of the shirt around your head. This method helps your curls or waves set without frizzing.

    4. Scrunching Perfect for Waves

    If you have wavy hair, scrunching can help maintain your hair’s natural pattern. Gently scrunch your hair with a soft, absorbent cloth or an old T-shirt to encourage wave formation while removing excess moisture.

    5. Natural Breeze Let Nature Do the Work

    On a warm day with a gentle breeze, take advantage of the natural elements to dry your hair. Sit outside or go for a leisurely stroll, allowing the wind to naturally dry your locks. Just remember to protect your hair from the sun’s harmful UV rays by using a UV-protective hair product or wearing a wide-brimmed hat.

    Drying your hair without a blow dryer is not only a healthier choice for your locks but also an eco-friendly option. Embrace these heat-free methods, and you’ll notice a positive difference in your hair’s texture, shine, and overall health. Say goodbye to the constant heat and hello to natural beauty!

    Photo by Shane on Unsplash

  • How to remove paint from plastic

    How to remove paint from plastic

    Removing paint from plastic can be a daunting task, but with the right techniques and tools, it can be done effectively. Whether you accidentally spilled paint on your favorite plastic item or want to give a fresh look to an old plastic surface, knowing how to remove paint from plastic is essential.

    One of the most effective methods for removing paint from plastic is by using rubbing alcohol or nail polish remover. These solvents contain chemicals that break down the paint and make it easier to remove. Simply soak a cloth or cotton ball in the solvent and gently rub it over the painted area until the paint starts to lift off.

    Another method is using a mixture of baking soda and warm water. Create a paste-like consistency by mixing equal parts of baking soda and water. Apply this paste onto the painted surface and let it sit for a few minutes before scrubbing it off with a soft-bristle brush or sponge.

    For more stubborn or thick layers of paint, you may need to resort to using a chemical-based paint stripper specifically designed for plastics. Be sure to follow the instructions provided by the manufacturer carefully and take necessary safety precautions such as wearing gloves and working in a well-ventilated area.

    In some cases, heat can also help in removing paint from plastic surfaces. Using a heat gun or hairdryer on low heat settings, gently apply heat over the painted area while simultaneously scraping off the softened paint with a plastic scraper or credit card.

    It is important to note that different types of plastics may react differently to these methods, so always test them on an inconspicuous area first before applying them to larger surfaces. Additionally, remember to clean up any residue left behind after removing the paint by washing the plastic thoroughly with soap and water.

    By following these techniques and taking proper precautions, you can successfully remove unwanted paint from your plastic items without causing damage. #DIY

    Photo by Ksenia Chernaya

  • How to get a comb out of your hair

    How to get a comb out of your hair

    We’ve all experienced that moment of panic when a comb gets stuck in your hair, creating a frustrating and potentially painful situation. Knowing how to get a comb out of your hair safely and without causing damage is crucial. In this guide, we’ll explore effective techniques for removing a comb, along with preventive tips to avoid this issue in the future. Plus, we’ll suggest helpful products such as the Wet Brush Pro Detangler and Aussie Miracle Hair Insurance Leave-In Conditioner to make the process easier.

    Stay Calm and Assess the Situation

    The first step in safely removing a stuck comb is to stay calm. Panicking or yanking the comb can lead to hair breakage, scalp irritation, or even hair loss. Instead, take a deep breath and assess the situation. Determine where the comb is stuck and the extent of the entanglement. Knowing these details helps you choose the right approach.

    Prepare Your Hair with Detangling Products

    To loosen the hair and make the detangling process easier, start by applying a detangling spray or conditioner to the affected area. The Aussie Miracle Hair Insurance Leave-In Conditioner is a great option for this, as it helps to lubricate the hair and reduce friction. Alternatively, the SheaMoisture Coconut & Hibiscus Kids Detangling Spray works well for gentle detangling, especially for curly hair.

    Once you’ve applied a detangler, let it sit for a minute or two to allow the hair to absorb the product. This will make it easier to work through the tangles without causing additional knots.

    Work the Comb Free with Patience

    When removing the comb, use gentle movements to avoid further entanglement. Hold onto the base of your hair near the scalp with one hand, and with the other hand, gently wiggle and twist the comb back and forth. Patience is key; take small movements and work through any snarls gradually.

    If the comb is stuck towards the ends of your hair, work from the tips upward. This approach minimizes stress on the hair shaft and reduces the risk of breakage. If it’s stuck near the scalp, use a wide-toothed comb like the Goody Detangle It Comb to carefully separate any knots around the trapped area.

    Dealing with Stubborn Tangles

    In cases where the tangle is particularly stubborn, apply more detangling spray or conditioner to soften the hair further. If the comb remains stuck, you can also use a warm, damp towel like the Utopia Towels Cotton Bath Towel to relax the hair. The heat and moisture can help make the hair more pliable, allowing you to work through the tangles with greater ease.

    Finger detangling can be helpful in tight spots. Use your fingers to carefully tease apart the knots and reduce tension in the hair. If you encounter resistance, avoid forcing the comb and take your time.

    When to Seek Professional Help

    If the comb remains stubbornly stuck despite your best efforts, it may be necessary to seek professional help from a hairstylist. Professionals have specialized tools and techniques to safely remove a comb without causing damage to your hair or scalp. They may use professional hair shears like the Kasho Professional Hair Shears to carefully cut through tight knots without damaging surrounding hair.

    When visiting a hairstylist, explain the situation and let them know what you’ve already tried. This information will help them determine the best course of action and provide additional tips to avoid similar issues in the future.

    Preventing Comb Mishaps in the Future

    Preventing a comb from getting stuck in your hair is the best way to avoid the frustration and potential damage that comes with it. Here are some tips to help you prevent comb mishaps:

    Use the Right Comb: A wide-toothed comb like the Goody Detangle It Comb is ideal for detangling, especially for thick or curly hair. Fine-toothed combs can cause tangles and should be used with caution.

    Comb in Sections: If you have long or thick hair, work in sections to avoid tangles. The Wet Brush Pro Detangler is a great tool for combing in sections, as it’s designed to reduce breakage.

    Apply Detangler Before Combing: Using a detangling spray or leave-in conditioner before combing helps reduce friction and makes it easier to work through tangles. The Aussie Miracle Hair Insurance Leave-In Conditioner is an excellent choice for this purpose.

    Avoid Combing Wet Hair: Hair is more prone to breakage when wet. If you need to comb wet hair, use a wide-toothed comb and be gentle.

    Brush Before Showering: Brushing or combing your hair before showering helps prevent tangles from forming during washing. This simple step can save you time and frustration later.

    Bringing It All Together

    Learning how to get a comb out of your hair involves patience, the right techniques, and proper tools. By staying calm, preparing your hair with detangling products, and working with gentle movements, you can safely remove a stuck comb without causing damage. If needed, seek professional help to avoid further complications.

    Prevention is also crucial—use wide-toothed combs, detangle in sections, and avoid over-combing to keep your hair healthy and tangle-free.

    Happy detangling! #everydaylife

    Photo by Tima Miroshnichenko

  • How to remove paint from brick

    How to remove paint from brick

    Painted brick can be unsightly and detract from the natural beauty of the material. Removing paint from brick can be a challenging task, requiring careful consideration and the right techniques to avoid damaging the surface. In this blog post, we will explore effective methods for removing paint from brick, allowing you to restore the original charm and character of your brickwork.

    Step 1: Safety Precautions:
    It’s important to take safety precautions when removing paint from brick to protect both yourself and the brick surface. Follow these steps:

    1. Wear protective eyewear, gloves, and a face mask to shield yourself from fumes, dust, and harsh chemicals.
    2. Cover any nearby plants, furniture, or other surfaces with drop cloths or plastic sheeting.
    3. Ventilate the area by opening windows or using fans to circulate air.

    Step 2: Chemical Stripper:
    Chemical strippers can be effective in removing paint from brick, especially for large areas. Follow these steps:

    1. Choose a chemical stripper specifically designed for masonry, and following the manufacturer’s instructions carefully.
    2. Apply the chemical stripper carefully to the painted surface with a brush, ensuring it is evenly spread out.
    3. Let the stripper sit for a period of time, typically 30 minutes to an hour, or as recommended by the manufacturer.
    4. Using a scraper or wire brush, gently scrape away the loosened paint and stripper.
    5. Rinse the surface with water to remove remaining stripper residue.

    Step 3: Power Washing:
    Power washing can remove paint from brick without the use of harsh chemicals. Follow these steps:

    1. Rent or purchase a power washer with the appropriate PSI setting for brick surfaces.
    2. Begin by using the widest spray nozzle and stand at least two feet away from the brick surface.
    3. Gradually move the spray wand closer to the surface until you feel it is effectively removing the paint.
    4. Adjust the PSI, as needed, to avoid damaging the brick.
    5. Rinse the surface with water after power washing.

    Step 4: Mechanical Grinding:
    Mechanical grinding can be used for smaller areas or on tough paint stains that didn’t respond to other methods. It’s important to use caution when grinding as it may damage the brick surface. Follow these steps:

    1. Attach a grinding wheel with coarse grit to an angle grinder.
    2. Carefully use the angle grinder, holding it at an angle, to grind away the paint on the brick surface.
    3. Move the angle grinder in a circular motion to cover the entire painted surface.
    4. Vacuum any remaining dust or debris.

    Removing paint from brick can be a challenging task, but with proper tools, techniques, and patience, it can be achieved effectively. Whether using a chemical stripper, power washing, or mechanical grinding, it’s essential to take necessary safety precautions to protect yourself and the brick surface. By restoring the original charm of your brickwork, you’ll enhance your property’s natural beauty and curb appeal.

    Photo by Kelly

  • How to remove dust from popcorn ceiling

    How to remove dust from popcorn ceiling

    In this blog post, we will explore effective methods for cleaning your home’s popcorn ceiling and how to remove dust from popcorn ceiling. Popcorn ceilings, also known as acoustic ceilings or textured ceilings, were once a popular choice for homeowners due to their unique appearance. However, over time, these textured surfaces can accumulate dust, making the ceiling look dingy and dull.

    In this blog post, we will explore effective methods to remove dust from popcorn ceilings, allowing you to restore their original charm and maintain a clean and healthy living environment.

    Step 1: Prepare the Area: Before tackling the task of cleaning your popcorn ceiling, it’s important to prepare the area to minimize the spread of dust. Follow these steps:

    Cover the floor and furniture with plastic sheets or drop cloths to protect them from falling dust. Turn off the HVAC system to prevent dust from circulating throughout the house. Protect yourself by wearing safety goggles, a dust mask, and disposable gloves.

    Step 2: Vacuum with a Soft Brush Attachment: Vacuuming with a soft brush attachment is a gentle but effective method to remove loose dust from popcorn ceilings. Here’s what you need to do:

    Attach a soft brush attachment to your vacuum cleaner’s hose or extension wand. Set the vacuum to low suction to avoid damaging the ceiling. Starting from one corner of the room, slowly run the brush attachment along the surface of the textured ceiling. Move in a systematic pattern, such as row by row or in sweeping motions, covering the entire ceiling. Pay extra attention to areas where dust may gather, such as corners and around light fixtures. Empty the vacuum regularly to prevent the dust from circulating back into the room.

    Step 3: Use an Extendable Duster: An extendable duster is an excellent tool for reaching high areas of the ceiling, especially for those who are unable to use a ladder. Follow these steps:

    Attach a clean microfiber or electrostatic duster to the end of the extendable handle. Extend the handle to the desired length, ensuring it is securely locked in place. Starting from one side of the ceiling, gently sweep the duster across the textured surface, applying light pressure. Work in small sections, moving methodically across the ceiling to remove dust effectively. Shake out the duster or replace it as needed to prevent redistributing dust.

    Step 4: Spot Clean with a Damp Cloth: For any remaining stubborn dust or stains on your popcorn ceiling, spot cleaning with a damp cloth can be effective. Proceed with caution, as excess moisture can damage the texture. Follow these steps:

    Dampen a soft, lint-free cloth with water. Ensure that it is only slightly damp, not soaking wet. Gently blot or wipe the cloth over the stained or dusty areas, applying minimal pressure. Avoid scrubbing vigorously, as this can cause the popcorn texture to dislodge or flatten. Allow the ceiling to air-dry completely before assessing the results.

    Removing dust from popcorn ceilings doesn’t have to be an intimidating task. By following these simple steps, you can effectively eliminate dust and restore the cleanliness and appeal of your popcorn ceiling. Remember to take necessary precautions, work methodically, and use gentle cleaning techniques to preserve the unique texture. With a little effort, your popcorn ceiling will once again be a cherished feature, enhancing the beauty of your living space.